Operation system for boards. The Operating System allows you to use the board as a security key.
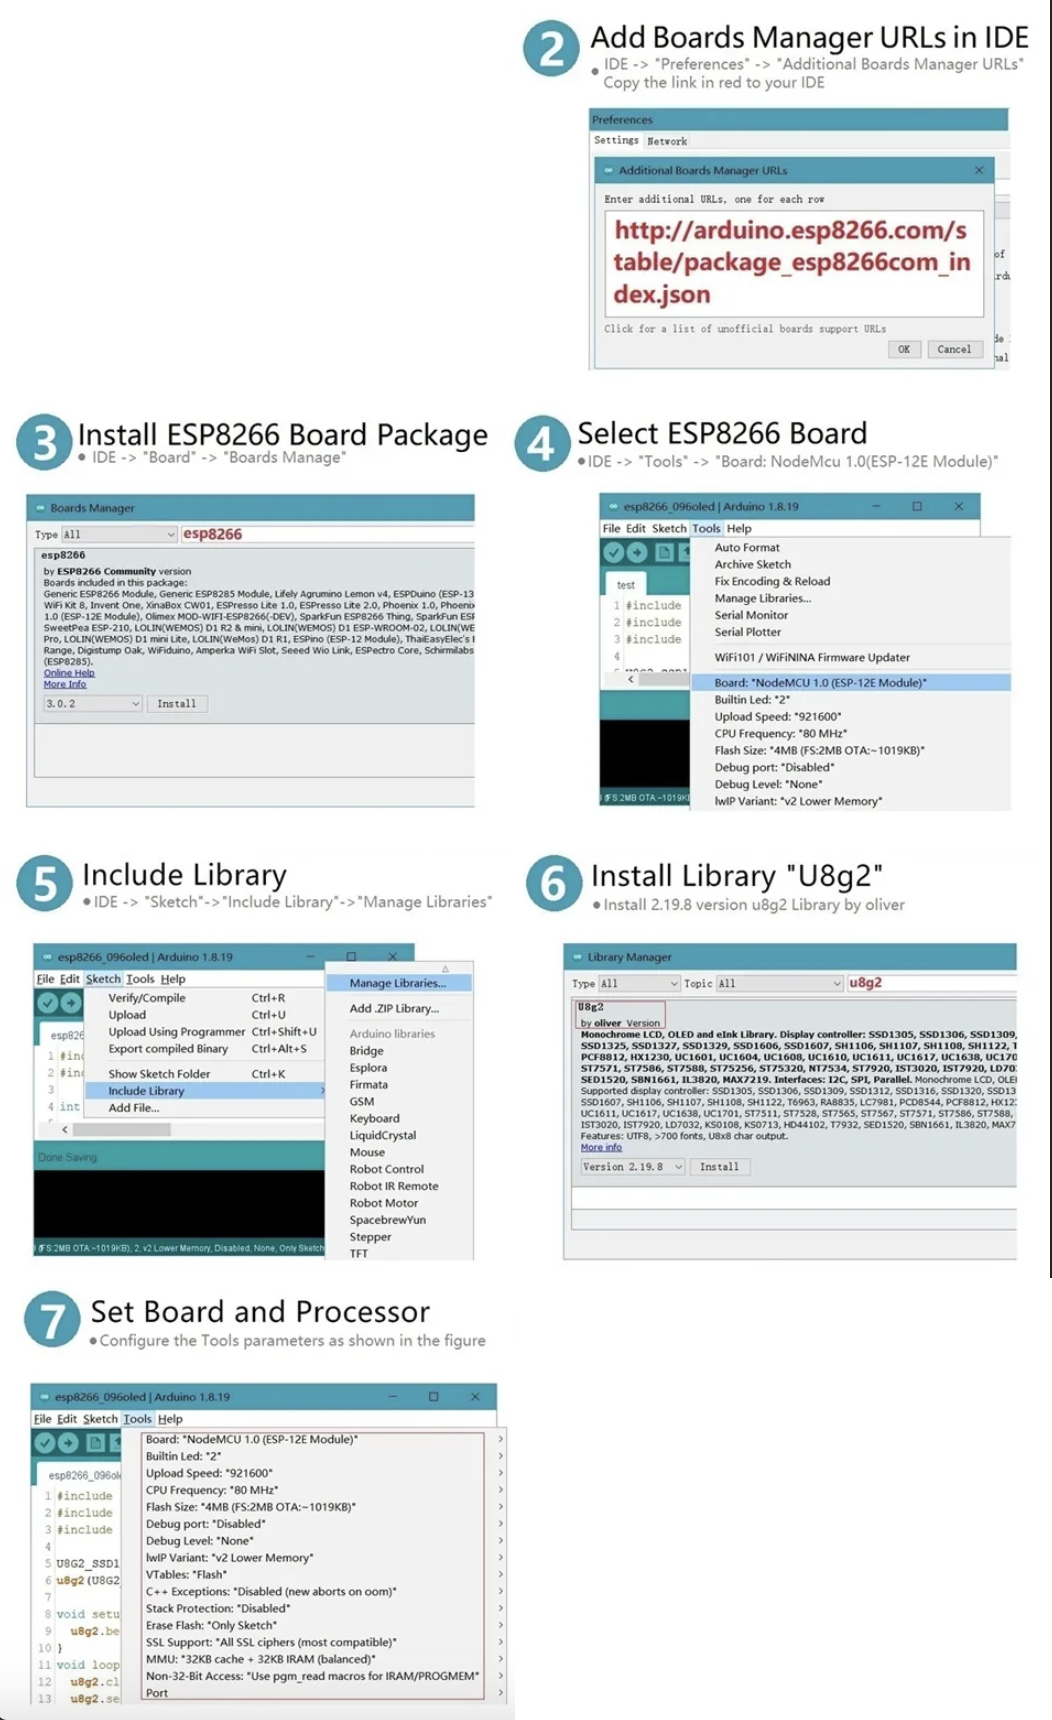
- ESP 8266 ideaspark Release Table
- ESP 8266 (regular) Release Table
- ESP 32 Release Table
- Rasberry Pi Pico Release Table
- Rasberry Pi Zero Release Table
Pinout
Conect to Computer
Pinout
Conect to Computer
Pinout
Conect to Computer
Pinout
Conect to Computer
Pinout
Conect to Computer
| OS Version | Connection Type | Release Data |
|---|---|---|
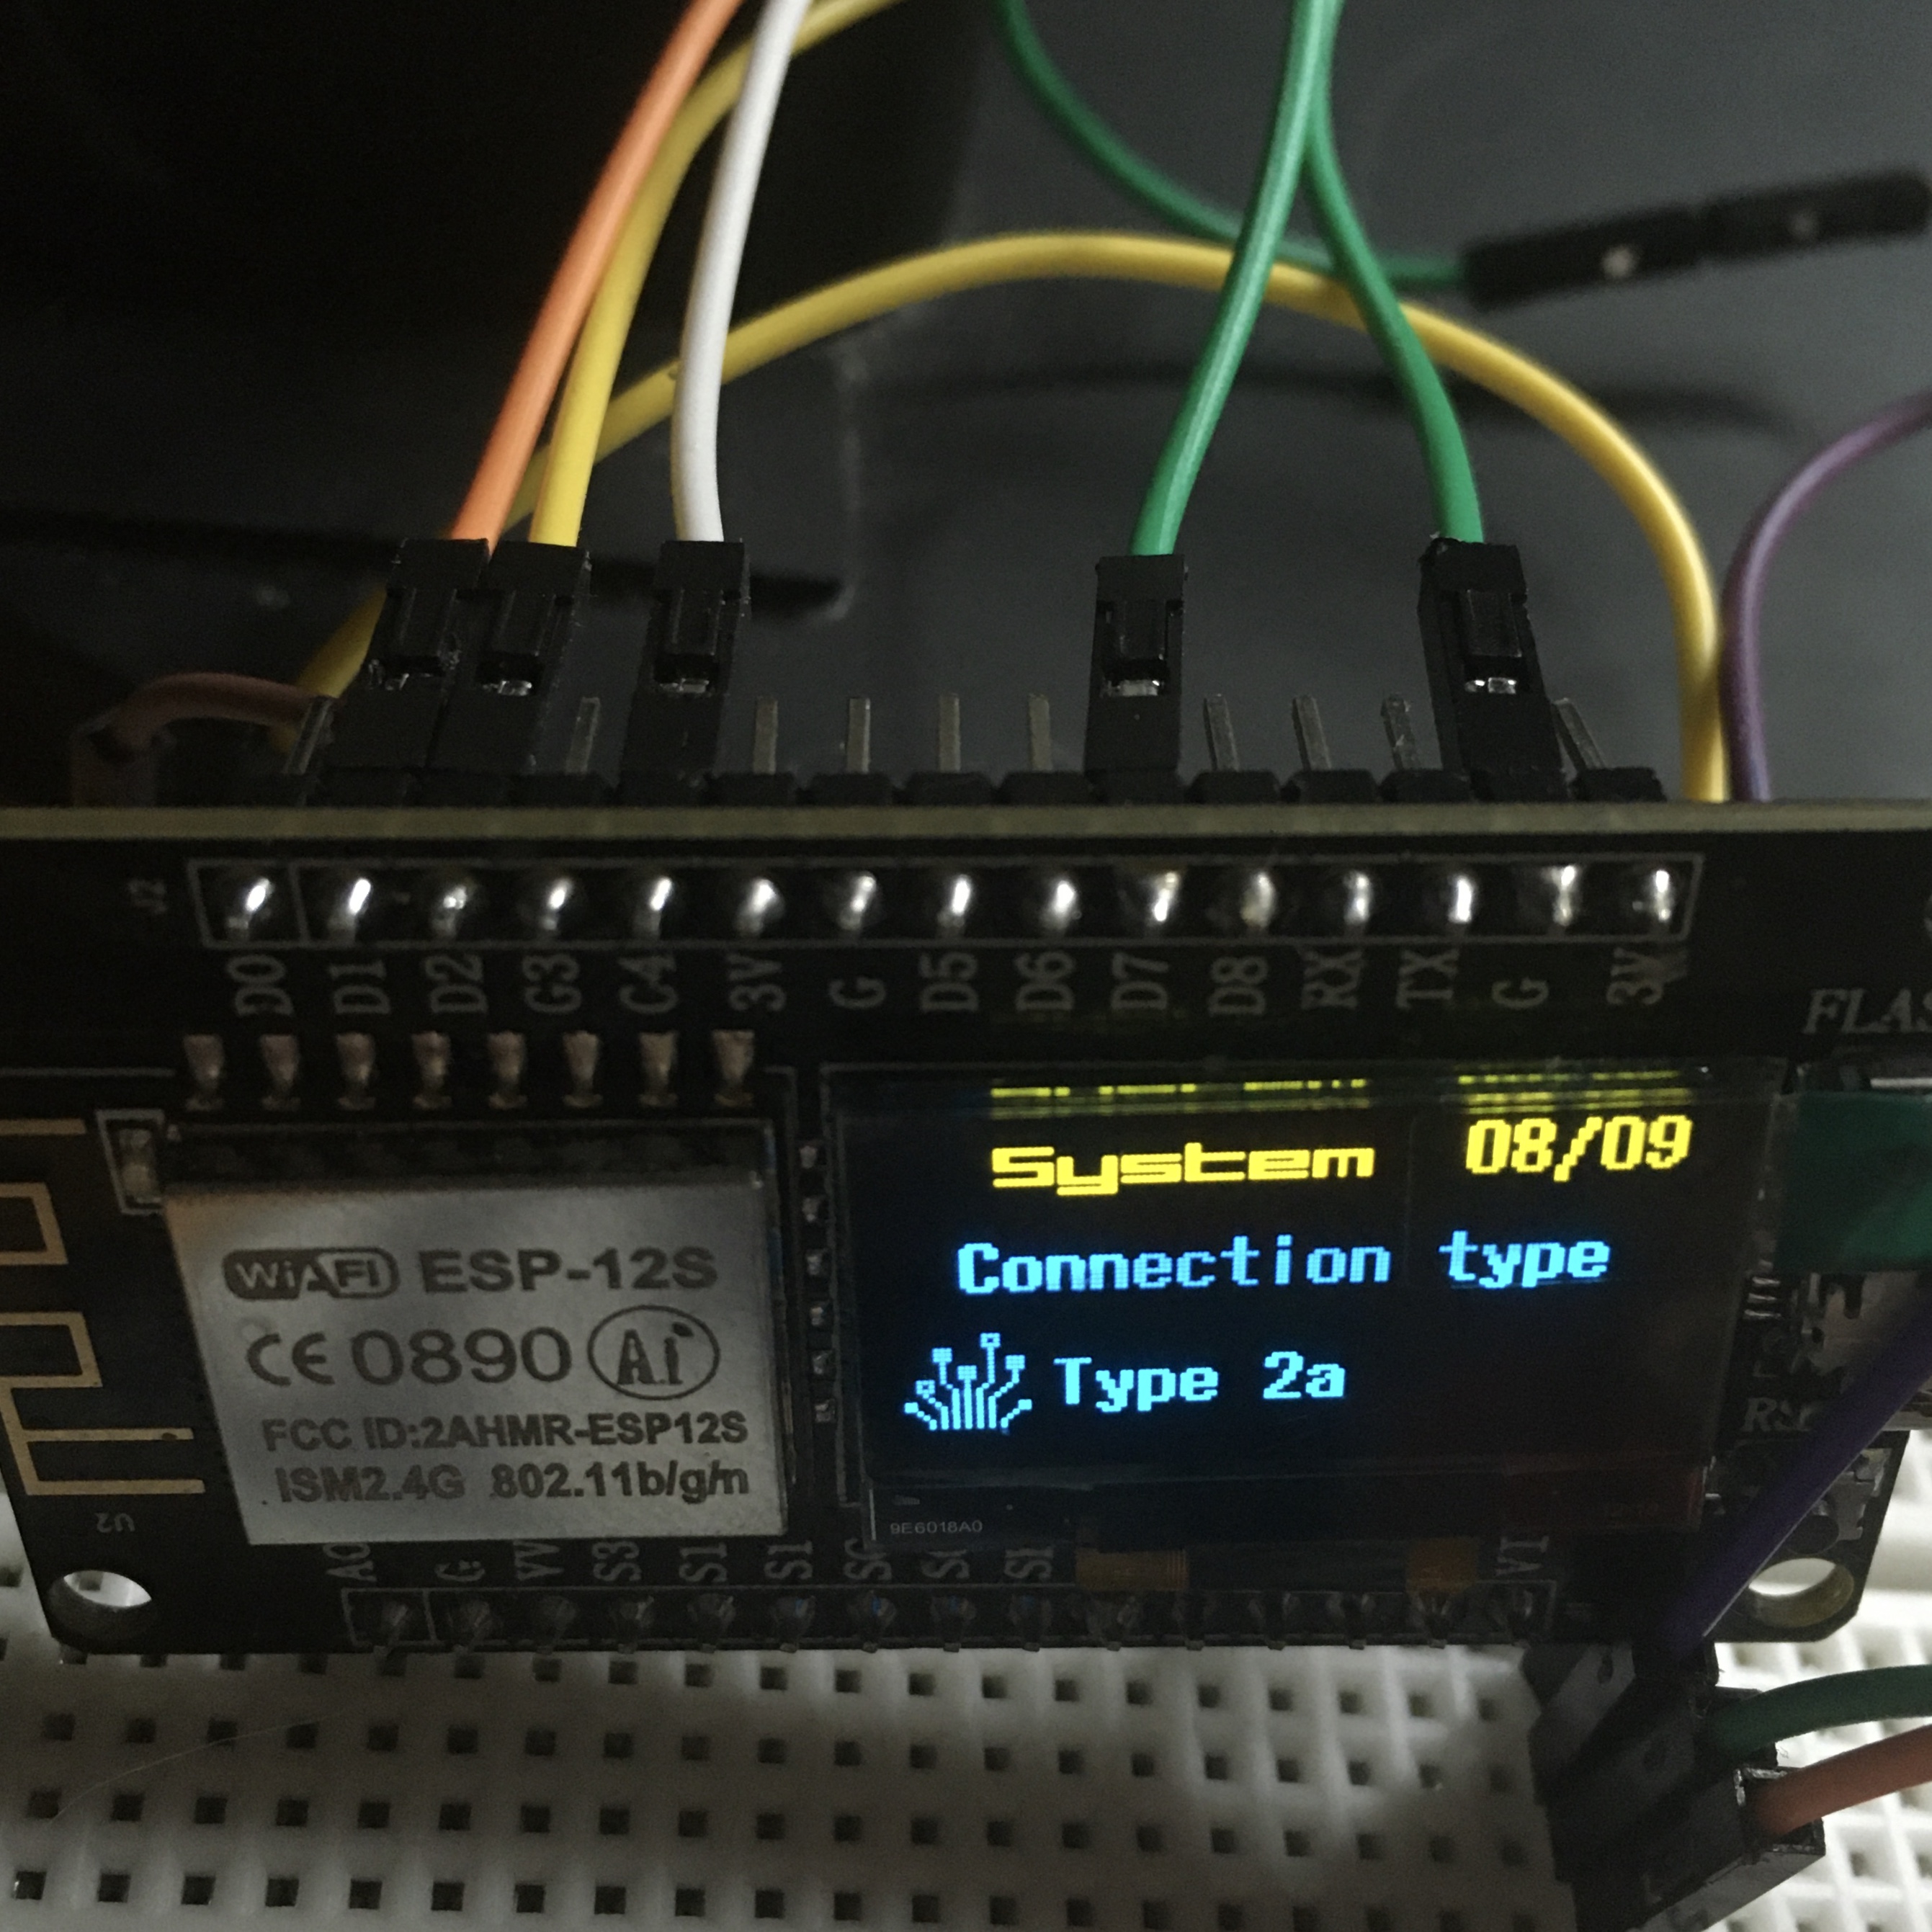
| Version 1 Beta 1 | Type 1 | 2024 5 May |
| Version 1 Beta 2 RC | Type 2a | 2024 18 May |
| OS Version | TOTP/OTP | Fido2 | U2F | WebAuthn |
|---|---|---|---|---|
| Version 1 Beta 1 | 1 Key | ❌ | ❌ | ❌ |
| Version 1 Beta 2RC | Infinity Keys | ❌ | ❌ | ❌ |
| OS Version | Connection Type | Release Data |
|---|---|---|
| ❌ | ❌ | ❌ |
| OS Version | TOTP/OTP | Fido2 | U2F | WebAuthn |
|---|---|---|---|---|
| ❌ | ❌ | ❌ | ❌ | ❌ |
| OS Version | Connection Type | Release Data |
|---|---|---|
| ❌ | ❌ | ❌ |
| OS Version | TOTP/OTP | Fido2 | U2F | WebAuthn |
|---|---|---|---|---|
| ❌ | ❌ | ❌ | ❌ | ❌ |
| OS Version | Connection Type | Release Data |
|---|---|---|
| ❌ | ❌ | ❌ |
| OS Version | TOTP/OTP | Fido2 | U2F | WebAuthn |
|---|---|---|---|---|
| ❌ | ❌ | ❌ | ❌ | ❌ |
| OS Version | Connection Type | Release Data |
|---|---|---|
| ❌ | ❌ | ❌ |
| OS Version | TOTP/OTP | Fido2 | U2F | WebAuthn |
|---|---|---|---|---|
| ❌ | ❌ | ❌ | ❌ | ❌ |
Image Original Source | Raw File | Download Image

- Linux AppImage 64 bits (X86-64)
- Linux ZIP file 64 bits (X86-64)
- macOS Intel, 10.15: “Catalina” or newer, 64 bits
- macOS Apple Silicon, 11: “Big Sur” or newer, 64 bits
Setup Bord
To Setup bord in program use this instraction:
Image Original Source |
Raw File |
Download Image
 This instruction is the same for all OS. Only the buttons can be located/look different.
| Board | Pereferial | Action |
|---|---|---|
| D1 | Button 1 Pin 1 | Top/Back To Menu |
| G (GND) | Button 1 Pin 2 | - |
| D2 | Button 2 Pin 1 | Botton |
| G (GND) | Button 2 Pin 2 | - |
| Flash | On Board | Apply |
Actual for:
| Board | Pereferial | Action |
|---|---|---|
| D1 | Button 1 Pin 1 | Top in Menu or Previous Page |
| G (GND) | Button 1 Pin 2 | - |
| D2 | Button 2 Pin 1 | Bottom in Menu or Next Page |
| G (GND) | Button 2 Pin 2 | - |
| C4 | Button 3 Pin 1 | Home |
| G (GND) | Button 3 Pin 2 | - |
| D7 | Button 4 Pin 1 | Apply |
| G (GND) | Button 4 Pin 2 | - |
| Flash or G3 | On Board | Sleep or Wake Up |
The connection is not consistent (D0..C4) due to the unstable behavior of the board specifically on some pins. This may just be my problem. However, I decided to avoid using these unstable pins to ensure users do not encounter similar issues. Additionally, I observed artifacts on the screen when using some of these pins.

This is a beta version and there are still bugs and shortcomings. Perhaps not all bugs were noticed and fixed. It is better to wait for the RC (Release Candidate) or Release release. Be careful!
🛠️ Bugs 🛠️:
- Time Sync Time is not automatically synchronized when the OS starts. You have to sync it manually.
2024 5 May
Connection Type:
Type 1
XenithOS.ino:
Raw
Download
XenithOS.cpp:
Raw
Download
Coppy code to Arduino ide, read instruction on line 9, or read it here:
1. Connect Wi-Fi (line 17-18).
2. Write your key (line 26).
3. Name Servise. (line 34).
4. You can change time server (line 21 or 22).
Bottom right you will see 2 icons:
Left icon is time sync status.
Right icon is wifi connection status.
! Problem with time
T No problem with time
X No Wi-Fi connection
W No problem with Wi-Fi
D1(pin) Button: Action top in menu or back to menu.
D2(pin) Button: Action bottom in menu.
Flash Button (on board): Action apply (open item in menu).
This is a Release Candidate version. There may be minor Bugs.
🛠️ Bugs 🛠️:
- Not found at this time.
2024 18 May
Connection Type:
Type 2a
XenithOS.ino:
Raw
Download
XenithOS.cpp:
Raw
Download
Coppy code to Arduino ide, read instruction on line 28, or read it here:
- Paste the Wi-Fi name in the first area
"". - Paste the Wi-Fi password in the second area
"". - You can add and remove networks, using one or multiple networks.
- Do not lose the
","after{"Network Name", "Password"}.- The correct format is
{"Network Name", "Password"},.
- The correct format is
- Uncomment one of the following lines to use it for time synchronization.
- Remove or add
//before the line to select the time server.
- The first area
""is the title/name of the service in the menu. - You can name it as you wish: MyMeta, Instagram5, @_name_, etc.
- Do not use
\,", or'in the title unless you properly escape them. - It is recommended to use letters (Aa-Zz) and numbers (0-9) in the title.
- When you obtain your TOTP Key for generation, it may have a format like this: X00X 00XX 0XXX XXXX.
- Remove spaces to get the correct format: X00X00XX0XXXXXXX. After that, paste the code into the second area
"".
- Remove spaces to get the correct format: X00X00XX0XXXXXXX. After that, paste the code into the second area
- Similar to Wi-Fi Networks, do not forget the
",".
- You can add or edit the app names/list/content.
- To add an app to the list, modify the array similar to Wi-Fi or TOTP. Add the app in the format
{"App name", AppView},.- After that, add
void AppView();before the array. - Then, develop or add the app.
- After that, add
The status bar has been redesigned and moved to the top. If there are problems with the Internet connection or time synchronization, you will see a triangular icon with “!” at the top right. You should check the Internet availability or run diagnostics in the "Diagnostic" application. Also there you will see the name or title of the application, service or menu.
D1(pin) Button: Action top in menu or back to menu.D2(pin) Button: Action bottom in menu.
D3(pin) Button: Action go Home in Menu.
D7(pin) Button: Action Apply or open application.
Flash Button or G3 (on board or pin): Action sleep/wake up board.