![]()
![]()

![]()
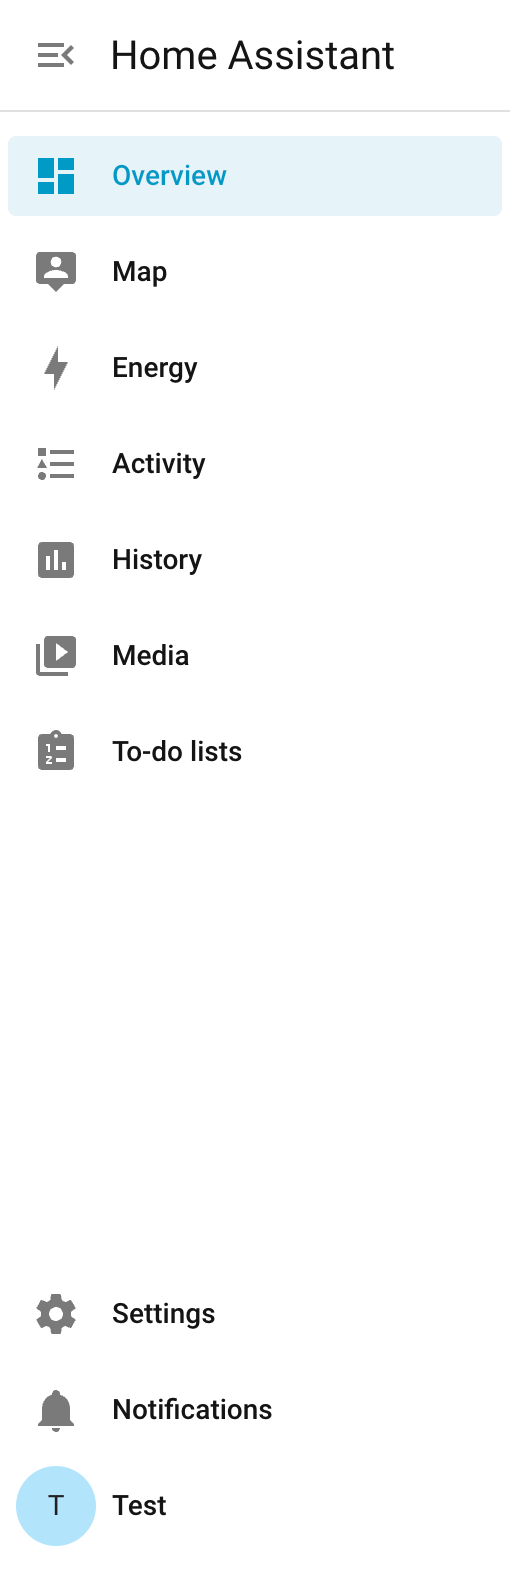
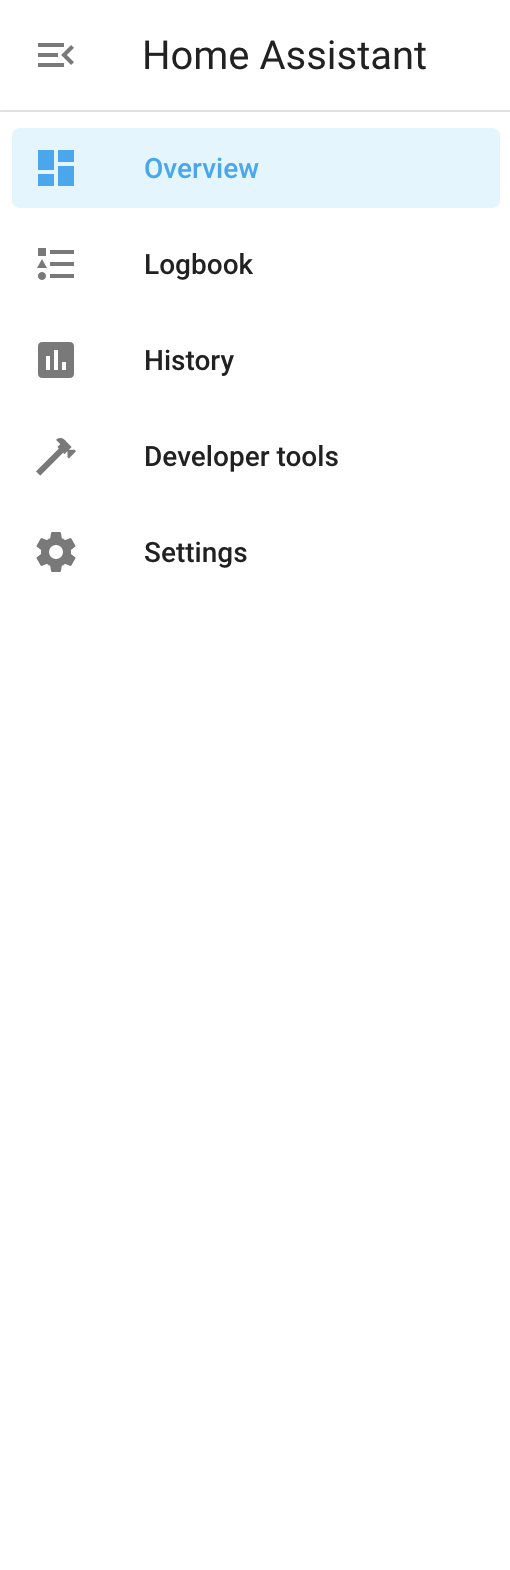
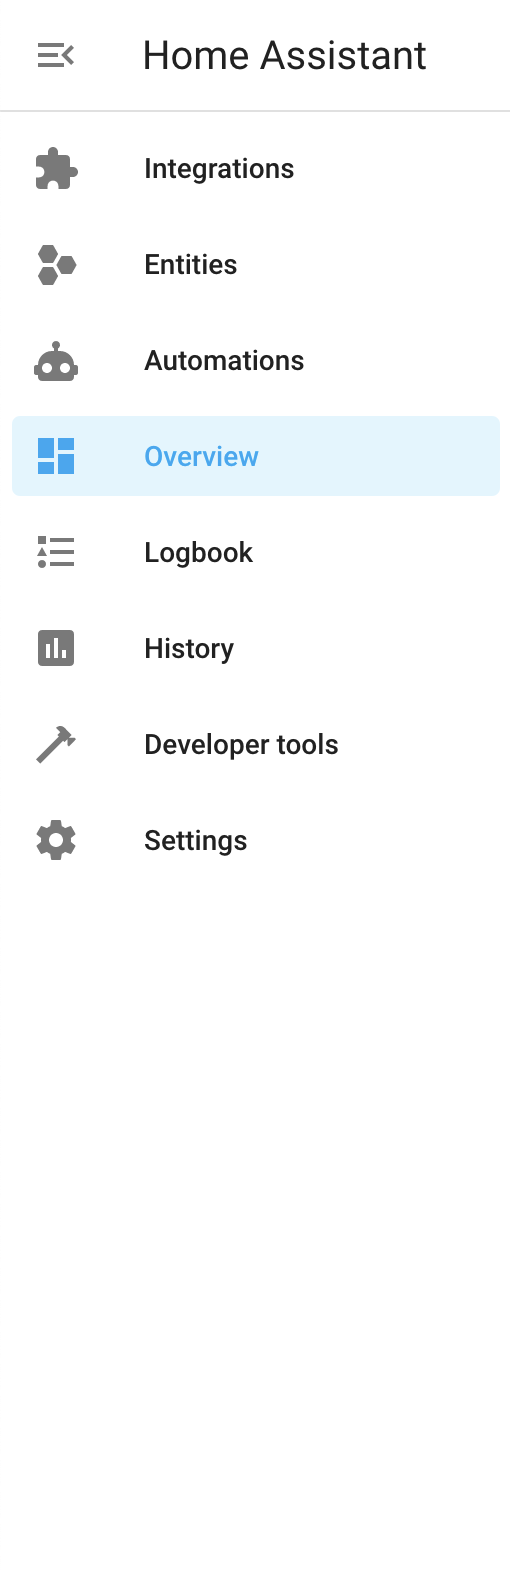
Custom HACS plugin that allows you to manage Home Assistant's sidebar items per user or device basis.
| Default sidebar | Hide some items | Add new items | Reorder items |
|---|---|---|---|
|
|
|

|
This is a refactor of custom-sidebar-v2 by @galloween, which unfortunatelly is now unmaintained and archived. In its beginning, @galloween's code was a refactor of the original Custom Sidebar plugin by @Villhellm (R.I.P.). This version refactored completely @galloween's code allowing to use a configuration in JSON (as @galloween's version) or in YAML (as @Villhellm's one), fixing several bugs, improving performance, and using home-assistant-query-selector to make it less likely to break with future Home Assistant front-end updates.
You can install the plugin manually or through HACS, not both. If you install the plugin using the two installations methods you could have issues or errors.
- Go to
HACSdashboard - Go to
Frontend - Click on the three-dots icon in the top-right corner
- Select
Custom repositories - In the
repositoryfield inserthttps://github.com/elchininet/custom-sidebarand in thecategoryselectLovelace - Click on
Add - Click on
Explore and download repositoriesbutton in the bottom-right of the screen - Search for
custom-sidebarand install it - Add the url of the plugin as an extra_module_url in your
configuration.yaml:
frontend:
  extra_module_url:
- /hacsfiles/custom-sidebar/custom-sidebar-json.js?v1.0.0frontend:
extra_module_url:
- /hacsfiles/custom-sidebar/custom-sidebar-yaml.js?v1.0.0- Make sure you add the correct version at the end of the URL (e.g.
?v=1.0.0) because in this way you make Home Assistant to load the new version instead of a version stored in cache - Restart Home Assistant
- Download the latest custom-sidebar release
- Copy
custom-sidebar-json.jsorcustom-sidebar-yaml.jsinto<config directory>/www/(depending on the configuration format that you are going to use,JSONorYAML) - Add the url of the plugin as an extra_module_url in your
configuration.yaml:
frontend:
  extra_module_url:
- /local/custom-sidebar-json.js?v1.0.0frontend:
extra_module_url:
- /local/custom-sidebar-yaml.js?v1.0.0- Make sure you add the correct version at the end of the URL (e.g.
?v=1.0.0) because in this way you make Home Assistant to load the new version instead of a version stored in cache - Restart Home Assistant
Depending on the file that you have added to extra_module_url, you will need to add your configuration in JSON or YAML format. If you used custom-sidebar-json.js you need to provide the configuration in JSON format. If you have used custom-sidebar-yaml.js you need to provide the configuration in YAML format.
Add a file named sidebar-config.json or sidebar-config.yaml into your <config directory>/www/ directory. It could be easier if you copy the example sidebar-config.json or the example sidebar-config.yaml file, delete the id parameter, and edit it to match your needs.
| Property | Type | Required | Description |
|---|---|---|---|
| order | Array of items | yes | List of items to process |
| title* | String | no | Custom title to replace the Home Assistant title |
| sidebar_editable | Boolean | no | If it is set to false, long press on the sidebar title will be ignored and the button to edit the sidebar in the profile panel will be disabled |
| styles | String | no | Custom styles that will be added to the styles block of the plugin |
| Property | Type | Required | Description |
|---|---|---|---|
| item | String | yes | This is a string that will be used to match each sidebar item by its text, its data-panel attribute or its href. If the exact property is not set, it is case insensitive and it can be a substring such as developer instead of Developer Tools or KITCHEN instead of kitchen-lights. |
| match | String | no | This property will define which string will be used to match the item property. It has three possible values "text" (default) to match the text content of the element, "data-panel" to match the data-panel attribute of the element, or "href", to match the href attribute of the element |
| exact | Boolean | no | Specifies whether the item string match should be an exact match (true) or not (false). |
| name* | String | no | Changes the name of the sidebar item |
| notification* | String | no | Add a notification badge to the sidebar item |
| order | Number | no | Sets the order number of the sidebar item |
| bottom | Boolean | no | Setting this property to true will group the item with the bottom items (Configuration, Developer Tools, etc) |
| hide | Boolean | no | Setting this property to true will hide the sidebar item |
| href | String | no | Specifies the href of the sidebar item |
| target | String | no | Specifies the target property of the sidebar item |
| icon | String | no | Specifies the icon of the sidebar item |
| new_item | Boolean | no | Set this property to true to create a new item in the sidebar. Using this option makes href and icon required properties |
* These options and item properties allow JavaScript or Jinja templates.
Short example in JSON format:
{
  "title": "My Home",
  "order": [
    {
      "new_item": true,
      "item": "Google",
      "href": "https://mrdoob.com/projects/chromeexperiments/google-gravity/",
      "icon": "mdi:earth",
      "target": "_blank",
      "order": 1
    },
    {
      "item": "overview",
      "order": 2
    },
    {
      "new_item": true,
      "item": "Integrations",
      "href": "/config/integrations",
      "icon": "mdi:puzzle",
      "order": 3
    }
  ]
 }
Short example in YAML format:
title: My Home
order:
  - new_item: true
    item: Google
    href: https://mrdoob.com/projects/chromeexperiments/google-gravity/
    icon: mdi:earth
    target: _blank
    order: 1
  - item: overview
    order: 2
  - new_item: true
    item: Integrations
    href: "/config/integrations"
    icon: mdi:puzzle
order: 3- All items in
config.ordershould have a uniqueitemproperty - Avoid an
itemproperty that could match multiple elements. If you find that an item property matches with multiple elements, try to use thematchandexactproperties to match the specific item that you want to match. - The items will be ordered according to their
orderproperty OR in the order of appearance - If you use the
orderproperty, make sure either all items (except hidden ones) have this property, or none of them (otherwise order may be messed up) - All the items placed in the bottom will be moved to the top by default. If you want to have some items in the bottom you need to add them to the
config.orderand specify theirbottomproperty ontrue. - Any items present in the Sidebar, but not in
config.order, will be shown on the bottom of the top part of the list - Notifications and user account are not part of the sidebar items so they will not be processed by this plugin
You can define user-specific order using exceptions feature. Exceptions can be used if you would like to define an order for a specific user/device.
| Property | Type | Required | Description |
|---|---|---|---|
| order | Array of items | yes | Defines the sidebar items order |
| base_order | Boolean | no | If true, the order property will be merged with the root config.order array |
| user | String or String[] | no | Home Assistant user name(s) you would like to display this order for |
| not_user | String or String[] | no | Home Assistant user name(s) you wouldn't like to display this order for |
| device | String or String[] | no | Device(s) you would like to display this order for. E.g. ipad, iphone, macintosh, windows, android (it uses the device's user-agent) |
| not_device | String or String[] | no | Device(s) you wouldn't like to display this order for. E.g. ipad, iphone, macintosh, windows, android (it uses the device's user-agent) |
Short example in JSON format:
{
  ...
  "exceptions": [
    {
      "user": ["Jim Hawkins", "Long John Silver"],
      "order": [
          ...
      ]
    }
  ]
}
Short example in YAML format:
...
exceptions:
  - user:
    - Jim Hawkins
    - Long John Silver
    order:
...- You cannot use
userandnot_userat the same time, doing so will end in an error - You cannot use
deviceandnot_deviceat the same time, doing so will end in an error - Pay attention to
base_orderproperty. If it's set tofalse(default value), the mainconfig.orderwill be ignored, leaving you with default sidebar modified only by the exception's orders
Some config options and item properties, as title, name and notification, admit templates. custom-sidebar admits two templating systems, JavaScript templates or Jinja templates. JavaScript templates are processed faster because the rendering is done in client side, Jinja templates need to perform a websocket call to receive the template result, but in general you should not notice many differences between the two in terms of performance. The main difference between the two templating systems (apart from the syntax) is that JavaScript can access local data like information about the user (name, is admin, is owner) or DOM APIs menwhile Jinja templates are agnostic to the device in which Home Assistant is being executed.
This templating system is not the same that Home Assistant implements. It is basically a JavaScript code block in which you can use certain client-side objects, variables and methods. To set a property as a JavaScript template block, include the code between three square brackets [[[ JavaScript code ]]]. If you don‘t use the square brackets, the property will be interpreted as a regular string.
The JavaScript code will be taken as something that you want to return, but if you have a more complex logic, you can create your own variables and return the desired result at the end.
The entities and domains used in the templates will be stored so if the state of these entities change, it will update the templates used in the configuration.
The next example will set the title of the sidebar as "My Home" followed by the current time. It will also add the number of HACS updates as a notification in the HACS item in the sidebar. In case that there are no updates, an empty string is returned and in these cases the notification will not be displayed. And it also creates a new item that redirects to the Home Assistant info page with a dynamic text with the word "Info" followed by the installed Supervisor version between parentheses.
{
  "title": "[[[ 'My Home ' + new Date(states('sensor.date_time_iso')).toLocaleTimeString().slice(0, 5) ]]]",
  "order": [
    {
      "item": "hacs",
      "notification": "[[[ state_attr('sensor.hacs', 'repositories').length || '' ]]]"
    },
    {
      "new_item": true,
      "item": "info",
      "name": "[[[ 'Info (' + state_attr('update.home_assistant_supervisor_update', 'latest_version') + ')' ]]]",
      "href": "/config/info",
      "icon": "mdi:information-outline"
    }
  ]
}title: '[[[ "My Home " + new Date(states("sensor.date_time_iso")).toLocaleTimeString().slice(0, 5) ]]]'
order:
- item: hacs
notification: '[[[ state_attr("sensor.hacs", "repositories").length || "" ]]]'
- new_item: true
item: info
name: '[[[ "Info (" + state_attr("update.home_assistant_supervisor_update", "latest_version") + ")" ]]]'
href: '/config/info'
icon: mdi:information-outlineNote:
Custom Sidebaruses Home Assistant Javascript Templates for theJavaScripttemplating system. To know all the objects, variables and methods available in theJavaScripttemplates, consult the proper section in the repository.
This templating system is the same that Home Assistant implements. You can use the majority of the template methods and objects. The entire template will be processed, rendered and the result will be used as the inner html of the element. If you don‘t want to display anything in certain scenarios, you should return an empty string in those cases.
When the entities and domains used in a templates change, it will trigger an update and the updated result of the template will be rendered.
The next example will set the title of the sidebar as "My Home" followed by the current time. It will also add the number of HACS updates as a notification in the HACS item in the sidebar. In case that there are no updates, an empty string is returned and in these cases the notification will not be displayed. And it also creates a new item that redirects to the Home Assistant info page with a dynamic text with the word "Info" followed by the installed Supervisor version between parentheses.
{
  "title": "My Home {{ as_timestamp(states('sensor.date_time_iso')) | timestamp_custom('%H:%M') }}",
  "order": [
    {
      "item": "hacs",
      "notification": "{{ state_attr('sensor.hacs', 'repositories') | length or '' }}"
    },
    {
      "new_item": true,
      "item": "info",
      "name": "Info ({{ state_attr('update.home_assistant_supervisor_update', 'latest_version') }})",
      "href": "/config/info",
      "icon": "mdi:information-outline"
    }
  ]
}title: 'My Home {{ as_timestamp(states("sensor.date_time_iso")) | timestamp_custom("%H:%M") }}'
order:
- item: hacs
notification: '{{ state_attr("sensor.hacs", "repositories") | length or "" }}'
- new_item: true
item: info
name: 'Info ({{ state_attr("update.home_assistant_supervisor_update", "latest_version") }})'
href: '/config/info'
icon: mdi:information-outlineCheck out Home Assistant's native sidebar tools, maybe it will be enough for your needs.
- You can use HA's
panel_customintegration to add internal links to the sidebar. Take a look at this tutorial. Official docs. - You can use HA's
panel_iframeintegration to add external links. See below. Official docs. - You can click and hold the Home Assistant header on top of the sidebar and then it will allow you to add/remove and re-order some of the items (but not add new custom ones). This feature is also accessible from your profile settings (if you click on your username in the bottom left corner)
If you use Home Assistant's Iframe Panel feature and have some iframe_panel links configured in configuration.yaml:
panel_iframe:
  router:
    title: "Router"
    url: "http://192.168.1.1"
    icon: mdi:router-wireless
  fridge:
    title: "Fridge"
    url: "http://192.168.1.5"
    icon: mdi:fridge
Then you can modify them as the regular ones:
{
  "order": [
    { "item": "fridge" },
    { "item": "overview" },
    { "item": "router" }
    ...
  ]
}order:
- item: fridge
- item: overview
- item: router
...